How To Estimate Building Materials For Home Construction In UK

Welcome to our guide on how to estimate building materials for home construction in the UK, where you will learn the practical steps needed to accurately calculate material quantities, control project costs, and reduce unnecessary waste before construction begins. Whether you are planning a self-build home, managing a renovation, or preparing for a new residential project, understanding how to estimate materials correctly can help prevent costly delays, improve budgeting accuracy, and streamline the entire building process. In this guide, we will explain the key calculations, planning methods, and industry best practices used to estimate foundations, walls, roofing, flooring, insulation, and finishing materials so you can approach your construction project with greater confidence and make informed decisions from start to finish.
To estimate building materials for home construction in the UK, start by reviewing detailed building plans and measuring the dimensions of foundations, walls, roofs, and floors. Calculate material quantities based on area or volume, include waste allowances, and account for UK building regulations, project specifications, and supplier requirements before ordering materials.
Why Material Estimation Matters Before Starting A Build
Material estimation is one of the most important early steps in any home-construction project. Before work begins on site, a clear estimate helps homeowners, builders, and suppliers understand what materials are needed, how much they may cost, and when they should be ordered. Without accurate material planning, even a well-designed project can face avoidable delays, wasted materials, and budget pressure.
The Impact Of Accurate Estimating On Project Costs
Accurate estimating gives you a clearer view of the full building budget before construction begins. In UK home construction, material costs can change depending on supplier availability, project size, location, specification level, and delivery requirements. A reliable building-materials estimate helps reduce guesswork and makes it easier to plan each stage with confidence.
- Budget Planning: A detailed estimate helps you understand the likely cost of core materials such as concrete, bricks, blocks, timber, roofing materials, insulation, plasterboard, and finishes. This gives the project a more realistic starting budget and helps prevent financial surprises later.
- Avoiding Unexpected Expenses: Poor estimating often leads to last-minute purchases, emergency deliveries, or changes to materials when stock is unavailable. These unplanned costs can quickly affect the overall construction budget, especially on larger home-building projects.
- Managing Supplier Orders: When quantities are calculated properly, materials can be ordered in the right amounts and at the right time. This helps avoid paying for unnecessary stock while also reducing the risk of holding up trades because essential materials have not arrived.
A strong estimate also supports better decision-making. For example, if the initial material estimate is higher than expected, the homeowner and builder can review specifications early, compare supplier options, or adjust non-structural finishes before work begins. This is much easier than trying to cut costs halfway through the build.
Reducing Material Waste And Site Delays
Good material estimation is not only about cost. It also helps keep the construction site organised and efficient. When materials are over-ordered, the site can become cluttered, storage becomes harder, and there is a higher chance of damage before installation. When materials are under-ordered, trades may be forced to stop work while waiting for new deliveries.
- Preventing Over-Ordering: Ordering too much material ties up money and can lead to waste, especially with products that are difficult to return or store safely. Items such as concrete, plaster, insulation, timber, and roof tiles should be calculated carefully to avoid unnecessary surplus.
- Avoiding Shortages During Construction: Running out of materials during an active build can delay bricklayers, roofers, plasterers, joiners, or other trades. Even a small shortage can affect the construction schedule if replacement materials are not available quickly.
- Improving Construction Efficiency: When material quantities are planned in advance, each stage of work can move more smoothly. Builders can schedule labour more accurately, suppliers can prepare deliveries, and the site team can focus on installation instead of solving avoidable supply problems.
Waste allowance is still important, but it should be controlled. Most building materials need a sensible allowance for cutting, breakage, handling, and installation loss. The key is to include enough extra material to cover realistic site conditions without turning the estimate into an inflated order.
Understanding UK Construction Cost Pressures
UK construction projects are affected by several cost pressures that make accurate material estimation even more important. Prices can vary between regions, suppliers, and seasons, while availability can change depending on demand and wider supply-chain conditions. A careful estimate helps reduce risk by giving the project team a clearer view of what is needed before prices or lead times change.
- Material Price Fluctuations: The cost of timber, steel, insulation, concrete, bricks, and roofing products can rise or fall based on supply, demand, energy costs, and manufacturing conditions. Updating estimates before ordering helps keep the budget closer to current market prices.
- Delivery Costs: Delivery charges can add a significant amount to the total material cost, especially for bulky or heavy items. Planning orders properly can reduce repeated deliveries and help suppliers coordinate loads more efficiently.
- Supply-Chain Considerations: Some materials may have longer lead times, particularly specialist bricks, roof tiles, windows, structural timber, or energy-efficiency products. Identifying these early helps prevent delays once construction is underway.
For UK home-construction projects, material estimation should be treated as an active planning tool rather than a one-time calculation. Estimates should be reviewed when plans change, when specifications are updated, or when supplier pricing shifts. This practical approach gives the project a stronger foundation and helps everyone involved make better-informed decisions.
Taking time to estimate building materials properly before starting a build can save money, reduce stress, and keep the project moving in the right direction. With clear measurements, realistic waste allowances, and up-to-date supplier information, homeowners and builders can plan more confidently and avoid many of the common problems that disrupt construction projects.

Information You Need Before Estimating Building Materials
Before you start calculating building material quantities, you need the right information in front of you. Accurate estimates depend on clear plans, a well-defined project scope, and a good understanding of the rules that apply to the build. Without these details, even the best construction material calculation can lead to over-ordering, shortages, budget issues, or delays once work begins.
Obtain Detailed Building Plans and Drawings
Detailed building plans are the foundation of a reliable material estimate. They show the size, layout, structure, and specifications of the home, allowing you to calculate materials based on measured information rather than guesswork. For UK home construction projects, these documents also help builders, suppliers, and quantity surveyors understand exactly what needs to be ordered and installed.
- Architectural drawings: These show the overall design, room layouts, elevations, wall positions, window openings, door openings, and floor areas. They are essential when estimating bricks, blocks, plasterboard, flooring, roofing materials, insulation, and finishing materials.
- Structural plans: These provide the technical details for load-bearing elements such as foundations, beams, columns, floor joists, lintels, roof structures, and reinforcement. They are especially important for calculating concrete volumes, steel reinforcement, timber framing, and other structural building materials.
- Site plans: These show how the property sits on the land, including boundaries, access points, drainage routes, levels, and external works. A site plan can affect material quantities for excavation, foundations, drainage, retaining walls, driveways, and landscaping-related construction work.
When reviewing plans, check that they are the latest approved version. Using outdated drawings can lead to incorrect measurements, missing materials, and costly changes during the build. It is also helpful to mark up each section as you complete the quantity takeoff, so nothing is counted twice or missed entirely.
Understand the Scope of the Home Construction Project
The scope of the project tells you what type of work is being carried out and how detailed your building materials estimate needs to be. A small extension will require a different estimating approach from a full new build home, while structural renovations often need careful attention because existing conditions can affect material requirements.
- New build homes: A new build usually requires a full material estimate covering foundations, walls, roofing, flooring, insulation, drainage, internal finishes, and external works. Because everything is being built from the ground up, the estimate should be broken down by construction stage to make ordering and budgeting easier.
- Extensions: Home extensions often involve connecting new work to an existing building. This means the estimate should include structural openings, matching materials, foundation tie-ins, roof connections, insulation upgrades, and any making-good work around the existing property.
- Self-build projects: Self-build homes need especially careful planning because the homeowner may be more involved in budgeting, supplier selection, and project scheduling. A clear material estimate helps reduce waste, compare supplier prices, and avoid delays caused by missing key materials.
- Renovations involving structural work: Renovations can be harder to estimate because hidden issues may not be visible until work begins. Older properties may need extra allowance for uneven walls, damaged timber, outdated foundations, or unexpected structural repairs.
A clear scope also helps separate essential materials from optional upgrades. For example, standard roof tiles, upgraded insulation, premium flooring, and specialist cladding can all change the final material cost. The more specific the scope is at the start, the more accurate the estimate will be.
Identify Local Building Regulations and Requirements
Building material estimates should not be based on measurements alone. In the UK, construction materials must also meet relevant Building Regulations, planning requirements, and structural standards. These rules can affect the type, quantity, and specification of materials used throughout the project.
- UK Building Regulations: These cover important areas such as structure, fire safety, ventilation, drainage, insulation, energy efficiency, sound resistance, and accessibility. For example, insulation materials must meet required thermal-performance standards, while structural materials must be suitable for the loads they are expected to carry.
- Planning permission considerations: Some projects must follow planning restrictions related to size, height, appearance, materials, and location. If a local authority requires specific external finishes, roof materials, or design details, these must be reflected in the material estimate before ordering begins.
- Structural compliance requirements: Structural elements such as foundations, beams, lintels, retaining walls, and roof supports should follow the approved engineer’s specifications. This ensures the correct concrete mix, steel reinforcement, timber sizes, fixings, and load-bearing materials are included in the estimate.
It is also important to consider local site conditions. Ground type, drainage, exposure to wind and rain, access limitations, and nearby structures can all influence material choices. For example, a site with poor ground conditions may require deeper foundations or additional reinforcement, while a property in an exposed area may need more robust roofing and weather-resistant materials.
Taking time to gather the right plans, define the project scope, and check compliance requirements will make the estimating process far more accurate. It also gives homeowners, builders, and suppliers a shared understanding of what the project needs before materials are priced, ordered, and delivered.

How To Calculate Foundation Materials
Accurately calculating foundation materials is one of the most important steps in any home construction project. The foundation supports the entire structure, so mistakes at this stage can lead to unnecessary costs, material shortages, project delays, or structural issues later on. Whether you are building a new home, planning a self-build project, or preparing a detailed construction budget, understanding how to estimate foundation materials correctly will help ensure your project starts on solid ground. The process involves measuring foundation dimensions, calculating concrete volumes, and determining the reinforcement materials needed to meet structural requirements.
Measuring Foundation Dimensions
Before calculating any materials, you need accurate measurements of the foundation. Construction drawings and engineering plans should always be used as the primary reference. Small measurement errors can significantly affect material quantities, especially on larger projects.
Length
Foundation length refers to the total linear distance of the footings or foundation trenches that will support the building. This measurement is typically taken from architectural or structural plans and should include all external and internal load-bearing walls.
When measuring foundation length, consider:
- External walls: Include the full perimeter of the building footprint.
- Internal load-bearing walls: Account for any structural walls requiring their own foundations.
- Additional foundation sections: Include extensions, porches, garages, or attached structures if they require separate footings.
Accurate length measurements form the basis for all subsequent concrete and reinforcement calculations.
Width
The width of the foundation determines how much surface area is available to distribute the building load into the ground. Foundation width varies depending on soil conditions, building design, and engineering requirements.
Several factors influence foundation width:
- Soil-bearing capacity: Weaker soils often require wider foundations.
- Building size: Larger structures generally need wider footings.
- Structural loads: Heavier construction materials can increase footing dimensions.
Always use the specified width shown on approved engineering drawings rather than relying on standard assumptions.
Depth
Foundation depth is equally important because it helps ensure stability and protects the structure from ground movement. In the UK, depth requirements may vary depending on soil type, nearby trees, drainage conditions, and local building regulations.
When determining depth, consider:
- Ground conditions: Clay soils may require deeper foundations due to seasonal movement.
- Frost protection: Foundations must extend below the frost line where required.
- Site-specific requirements: Engineers may specify additional depth for challenging ground conditions.
Accurate depth measurements allow you to calculate the total volume of concrete needed for the foundation.
Estimating Concrete Requirements
Once foundation dimensions have been established, the next step is calculating how much concrete will be required. Ordering the correct amount helps prevent delays, reduces waste, and ensures the foundation can be poured efficiently.
Calculating Cubic Metres
Concrete is typically ordered by cubic metre. To calculate the required volume, multiply the foundation length by its width and depth.
The basic formula is:
Length × Width × Depth = Cubic Metres of Concrete
For example, if a foundation measures 25 metres long, 0.6 metres wide, and 0.3 metres deep, the calculation would be:
25 × 0.6 × 0.3 = 4.5 cubic metres
It is generally advisable to include a small contingency allowance to account for uneven excavation, minor site variations, and practical construction requirements.
Common factors that may increase concrete usage include:
- Excavation irregularities: Trenches are not always perfectly uniform.
- Ground settlement: Some areas may require additional concrete.
- Construction tolerances: Minor variations occur on most building sites.
Careful calculations reduce the risk of under-ordering while helping control overall construction costs.
Accounting for Footing Variations
Not all foundations are identical. Different parts of a building may require different footing sizes depending on structural loads and site conditions.
Examples of footing variations include:
- Stepped footings: Used on sloping sites where foundation levels change.
- Thickened sections: Added beneath heavily loaded structural areas.
- Pad foundations: Installed beneath columns or concentrated load points.
- Reinforced foundation zones: Designed for specific structural requirements.
When estimating concrete quantities, calculate each footing section separately and then combine the totals. This approach provides greater accuracy than applying a single measurement across the entire foundation system.
Calculating Reinforcement Materials
Concrete performs exceptionally well under compression but requires reinforcement to resist tension and structural movement. Reinforcement materials help improve durability, reduce cracking, and increase the overall strength of the foundation.
Steel Reinforcement Requirements
Structural engineers determine reinforcement requirements based on building loads, soil conditions, and foundation design. Reinforcement typically consists of steel bars positioned within the concrete before pouring.
Several factors influence reinforcement quantities:
- Foundation type: Strip foundations, raft foundations, and pad foundations require different reinforcement layouts.
- Load requirements: Heavier structures generally need additional steel.
- Soil movement risks: Areas with expansive soils may require enhanced reinforcement.
- Engineering specifications: Structural drawings provide exact placement and sizing details.
When estimating reinforcement materials, always refer to the engineer’s schedule rather than relying on generic calculations.
Mesh and Rebar Considerations
Many foundation systems use a combination of reinforcing mesh and steel rebar to achieve the required structural performance. Each serves a specific purpose within the concrete structure.
- Rebar: Provides strength in areas subject to higher structural loads.
- Reinforcing mesh: Helps distribute loads evenly and reduce surface cracking.
- Starter bars: Connect foundations to walls or other structural elements.
- Lapped connections: Allow reinforcement sections to overlap for continuity.
When calculating reinforcement quantities, include allowances for overlaps, bends, corner details, and waste generated during installation. These additional requirements are often overlooked during early estimating but can significantly affect total material needs.
Accurate reinforcement estimates help ensure compliance with structural specifications while avoiding costly delays caused by missing materials during construction.
A well-planned foundation estimate provides a strong starting point for any home construction project. By carefully measuring dimensions, calculating concrete volumes, and accounting for reinforcement requirements, builders and homeowners can improve budgeting accuracy, minimize waste, and create a reliable foundation that supports the long-term performance of the structure.

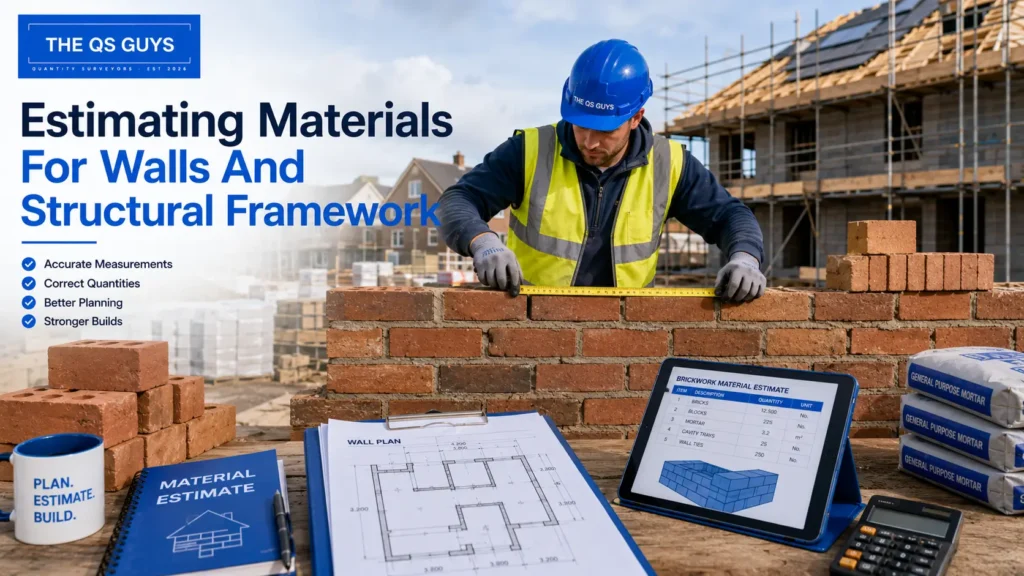
Estimating Materials For Walls And Structural Framework
Estimating materials for walls and structural framework is one of the most important stages in home-construction planning because it affects cost, strength, build-time, and overall material ordering. Walls, partitions, timber framing, roof supports, and floor structures all need accurate calculations to avoid shortages, overspending, and unnecessary waste on-site.
Calculating Brick Quantities
Brick quantities are usually calculated by measuring the total wall area in square metres, then multiplying that area by the number of bricks needed per square metre. In UK construction, a standard single-skin brick wall typically uses around 60 bricks per square metre, but this can vary depending on the brick size, wall type, and bond pattern.
Mortar joints must also be included in the estimate because they affect spacing and total coverage. A common mistake is calculating only the brick size without allowing for the mortar joint, which can lead to over-ordering or inaccurate wall measurements.
Waste allowances are also essential. Bricks can break during delivery, cutting, storage, or installation, so it is usually sensible to add around 5% to 10% extra depending on the complexity of the wall.
- Wall area: Measure the height and length of each wall, then subtract large window and door openings.
- Brick rate: Use the correct bricks-per-square-metre figure for the wall type and brick size.
- Waste allowance: Add extra materials for cuts, breakages, and on-site handling.
Estimating Blockwork Materials
Blockwork materials are commonly used for external walls, internal load-bearing walls, and partition walls. The estimate should begin with the wall area, just like brickwork, but the number of blocks required per square metre will depend on the block size and layout.
Concrete blocks are often used where strength, durability, and load-bearing capacity are important. Aircrete blocks are lighter and provide better thermal performance, making them useful for energy-efficient construction and internal walls.
Internal partition walls may require different materials depending on the design. Some partitions are built with blockwork for strength and sound insulation, while others use timber or metal-stud systems with plasterboard.
- Concrete blocks: Best suited for strong structural walls and areas where durability is important.
- Aircrete blocks: Useful for thermal performance, easier handling, and quicker installation.
- Partition walls: Estimate based on wall layout, room divisions, acoustic needs, and finish requirements.
Timber Requirements For Structural Framing
Timber-framing estimates must be based on the structural drawings, not guesswork. Timber sizes, spacing, and load requirements are usually specified by a structural engineer or building designer, especially for roof trusses, floor joists, and load-bearing stud walls.
Stud walls require vertical studs, top plates, bottom plates, noggins, fixings, and sometimes additional timber around openings. Roof trusses are usually designed and manufactured to specification, so the estimate should include the number of trusses, spacing, bracing, and associated fixing materials.
Floor joists must be calculated according to the floor span, timber size, spacing, and load requirements. Underestimating joist materials can delay the build, while using the wrong specification can create serious structural issues.
- Stud walls: Include studs, plates, noggins, fixings, and extra timber around doors or service areas.
- Roof trusses: Use the roof design and manufacturer specifications to calculate truss numbers and spacing.
- Floor joists: Follow structural drawings to confirm joist size, centres, span, and support requirements.
Factors That Affect Material Quantities
Several design and site-specific factors can change the amount of material needed for walls and structural framework. Even small changes in openings, wall height, layout, or specification can affect the final quantity takeoff.
Openings for windows and doors reduce the total wall area but often require additional lintels, framing, supports, fixings, or reinforcement. A simple square room is easier to estimate than a home with angled walls, high ceilings, multiple extensions, or complex rooflines.
Building specifications also play a major role. Fire-rating requirements, insulation standards, acoustic performance, structural loads, and UK Building Regulations can all influence the type and quantity of materials required.
- Openings: Subtract window and door areas from wall calculations, but allow for lintels, trims, and extra framing.
- Design complexity: More corners, angles, levels, and roof shapes usually mean more cuts and more waste.
- Building specifications: Always check the approved plans, structural details, and compliance requirements before ordering.
Accurate wall and structural-framework estimates help keep the project organised, cost-controlled, and easier to manage from the first material order through to installation. By working from detailed plans, allowing for waste, and checking specifications carefully, homeowners and builders can reduce mistakes and make better decisions before construction begins.
How To Estimate Roofing Materials
Estimating roofing materials is one of the most important steps in planning a home-construction project because roof measurements affect cost, ordering accuracy, labour planning, and waste control. A roof is rarely as simple as a flat rectangle, especially when pitch, ridges, valleys, verges, dormers, and different covering materials are involved. Getting this stage right helps prevent material shortages, unnecessary over-ordering, and delays once roofing work begins.
Measuring Roof Area Correctly
Accurate roof-area measurement starts with understanding the shape and pitch of the roof. While floor plans can give a basic footprint, they do not show the true surface area of a pitched roof. A sloped roof has more surface area than the horizontal space it covers, so the pitch must be included in the calculation.
Roof pitch calculations are usually based on the roof’s rise compared with its run. A steeper roof will require more tiles, battens, felt, fixings, and labour because the surface area increases. For example, a low-pitch roof may only need a modest allowance above the building footprint, while a steep-pitch roof can add a significant amount of extra material.
To estimate the total surface area, measure each roof plane separately, then multiply the length by the slope length rather than the flat horizontal width. If the roof has multiple sections, such as hips, valleys, gables, or extensions, calculate each section on its own before adding them together. This approach gives a more reliable figure than using one broad estimate for the entire roof.
Key factors to check include:
- Roof pitch: A steeper pitch increases the total roof surface and affects the quantity of roof tiles, underlay, battens, and fixings required.
- Roof shape: Simple gable roofs are easier to measure, while hip roofs, dormers, and intersecting roof sections need more detailed calculations.
- Waste allowance: Extra material should be included for cutting, breakage, overlaps, and complex roof edges.
- Plan accuracy: Measurements should be checked against architectural drawings, structural details, and on-site dimensions before ordering.
Estimating Roof Tiles Or Slates
Once the total roof area is known, the next step is estimating the number of roof tiles or slates required. This depends on the chosen roofing material, tile size, manufacturer coverage rate, and required overlap. In the UK, suppliers usually provide an approximate number of tiles per square metre, but this figure should always be checked against the exact product specification.
Tiles per square metre can vary widely. Concrete tiles, clay tiles, and natural slates all have different coverage rates. Some large-format tiles may cover more area with fewer units, while smaller slates may require many more pieces per square metre. The roof pitch can also affect the required lap, which means the same tile may have a different coverage rate depending on the roof design.
Ridge tiles should be calculated separately because they run along the top line where two roof slopes meet. Measure the total ridge length and divide it by the coverage length of each ridge tile, allowing extra for cuts and end details. Hip tiles may also be required if the roof includes hip sections, so they should not be overlooked during the material takeoff.
Verge details also affect the estimate. The verge is the roof edge at the gable end, and it may require dry-verge units, mortar bedding, undercloak, or specific edge tiles depending on the chosen roofing system. These smaller components are easy to miss, but they are essential for weather protection and a neat finish.
A practical tile or slate estimate should include:
- Main roof covering: Calculate tiles or slates using the confirmed roof area and the manufacturer’s coverage rate per square metre.
- Ridge materials: Measure the full ridge length and include ridge tiles, ridge unions, dry-ridge systems, or bedding materials where required.
- Verge components: Include dry-verge units, edge tiles, undercloak, or mortar-related materials based on the roof specification.
- Cutting allowance: Add extra material for valleys, hips, edges, and awkward junctions where tiles or slates need trimming.
Additional Roofing Materials Often Overlooked
Roofing estimates should not stop at tiles or slates. A complete roofing-material calculation also needs to include the layers and accessories that sit beneath and around the main roof covering. These supporting materials are essential for weather resistance, ventilation, stability, and long-term roof performance.
Roofing felt, also called breathable membrane or roof underlay, is installed beneath the tiles or slates to provide secondary weather protection. It should be calculated based on the total roof area, with extra allowance for overlaps at horizontal and vertical joints. The amount of overlap may vary depending on roof pitch and manufacturer guidance, so it is important to check the product instructions before ordering.
Battens are another key component. They are fixed across the roof structure and provide the support for tiles or slates. Batten quantity depends on the roof area, tile gauge, spacing, and roof design. Smaller tiles or slates usually require closer batten spacing, which increases the total length of battens needed.
Flashings are used around roof junctions, chimneys, valleys, abutments, roof windows, and other vulnerable areas where water could enter. Lead flashing, lead alternatives, soakers, valley trays, and apron flashings should be included where the design requires them. Missing these items from the estimate can cause delays because roofing work often cannot be finished properly without them.
Fixings are also easy to underestimate. Nails, screws, clips, ridge fixings, verge fixings, and tile clips may all be needed depending on the roof covering and local exposure conditions. In wind-exposed areas, fixing requirements may be higher, so the roofing specification should be checked carefully.
Common overlooked roofing materials include:
- Roofing felt: Measure the full roof area and include enough extra underlay for overlaps, laps, wastage, and detailing around edges.
- Battens: Estimate batten lengths based on tile gauge, roof pitch, and roof area, then allow extra for cuts and jointing.
- Flashings: Include materials for chimneys, valleys, abutments, roof windows, and wall junctions to support proper weatherproofing.
- Fixings: Account for nails, screws, clips, ridge fixings, verge fixings, and any additional fixings required by the manufacturer or site conditions.
A careful roofing-material estimate should cover the full roofing system, not just the visible roof tiles or slates. By measuring the roof area properly, checking product coverage rates, and allowing for underlay, battens, flashings, fixings, and waste, homeowners and builders can create a more accurate budget and reduce the risk of delays once roofing work begins.

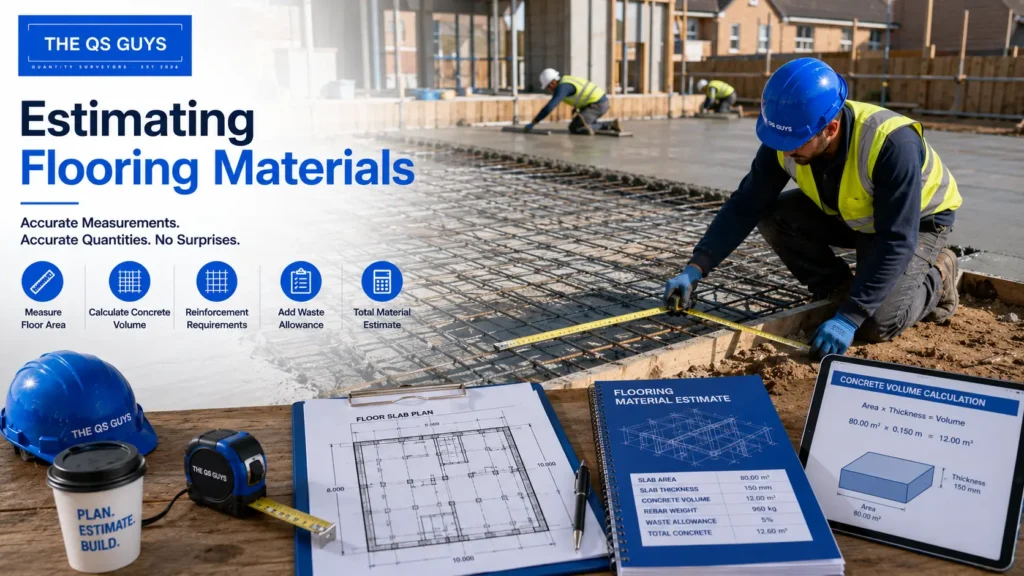
Estimating Flooring Materials
Accurately estimating flooring materials is an important part of planning any home construction project in the UK. Whether you are installing a concrete floor slab or a timber flooring system, careful calculations help prevent material shortages, reduce waste, and keep construction costs under control. Flooring materials form the foundation for finished living spaces, so taking the time to calculate quantities correctly can improve efficiency and help avoid costly delays during the building process.
Calculating Concrete Floor Slabs
Concrete floor slabs are commonly used in modern home construction because they provide strength, durability, and long-term stability. Estimating the correct amount of concrete starts with understanding the floor area and the required slab thickness.
Floor Area Measurements
The first step is measuring the total floor area that the concrete slab will cover. This is typically calculated by multiplying the length of the space by its width. For simple rectangular rooms, the process is straightforward. However, homes with extensions, alcoves, or irregular shapes may require the area to be divided into smaller sections before calculating the total.
Accurate measurements are essential because even small errors can result in ordering too much or too little concrete. When reviewing construction plans, it is important to verify all dimensions and account for any changes that may have been made during the design stage.
Some factors that can affect floor area calculations include:
- Room Shape: Irregular layouts often require separate measurements for different sections.
- Internal Features: Stairwells, service ducts, and openings may need to be excluded from calculations.
- Future Modifications: Design changes during construction can alter the required floor area.
Slab Thickness Calculations
Once the floor area has been measured, the next step is determining the slab thickness. The required thickness depends on factors such as structural loads, building design, soil conditions, and engineering specifications.
To calculate the volume of concrete needed, multiply the floor area by the slab thickness. The result is typically expressed in cubic metres, which is the standard measurement used when ordering concrete in the UK.
For example, a floor area of 100 square metres with a slab thickness of 0.15 metres would require approximately 15 cubic metres of concrete before allowing for waste or site-specific adjustments.
When calculating slab requirements, consider:
- Structural Requirements: Heavier loads may require thicker slabs.
- Ground Conditions: Poor soil conditions can influence slab design.
- Reinforcement Needs: Steel reinforcement may affect overall specifications.
- Construction Tolerances: Small adjustments are often required during installation.
Estimating Timber Flooring Materials
Timber flooring systems remain popular in residential construction because they provide flexibility, natural appearance, and ease of installation. Estimating timber flooring materials involves calculating floorboards, underlay, and structural support components such as joists.
Floorboards
Floorboards are typically calculated based on the total floor area. Manufacturers often provide coverage rates that indicate how many square metres each pack will cover. When estimating floorboards, it is important to account for the installation pattern, board width, and room layout.
Straight installation patterns generally create less waste, while diagonal or decorative patterns often require additional materials due to increased cutting.
Important considerations include:
- Board Dimensions: Wider boards cover more area but may have different installation requirements.
- Installation Pattern: Complex layouts usually increase waste.
- Product Coverage: Always verify manufacturer coverage rates before ordering.
Underlay
Underlay is installed beneath timber flooring to improve insulation, sound reduction, and overall floor performance. The amount of underlay required generally matches the total floor area, although additional material may be needed for overlaps and trimming around edges.
Selecting the correct underlay is particularly important in UK homes where energy efficiency and noise reduction are often priorities. Different underlay products offer varying levels of thermal and acoustic performance.
Factors to consider include:
- Thermal Performance: Helps improve energy efficiency.
- Acoustic Properties: Reduces noise transmission between rooms.
- Moisture Protection: Some products include moisture-resistant barriers.
Joists
Joists provide structural support beneath timber floors and must be estimated carefully to ensure stability and compliance with building requirements. Calculating joists involves determining spacing, span lengths, and overall floor dimensions.
The quantity required depends on the design specifications and structural loads. Consulting structural drawings is essential when estimating joist quantities because spacing and sizing requirements vary between projects.
Key considerations include:
- Joist Spacing: Closer spacing generally requires more materials.
- Span Length: Longer spans may require larger joists.
- Load Requirements: Structural loads influence joist specifications.
Allowing for Waste and Cutting Losses
One of the most common estimating mistakes is ordering only the exact quantity of materials shown by calculations. In reality, flooring projects almost always generate waste through cutting, trimming, damage, and installation adjustments.
Recommended Waste Percentages
Adding an appropriate waste allowance helps ensure sufficient materials are available throughout the project. The recommended percentage depends on the material type and complexity of the installation.
Typical waste allowances include:
- Concrete: Around 5% to account for spillage and placement variations.
- Timber Flooring: Typically 7% to 10% for standard installations.
- Complex Flooring Patterns: Often 10% to 15% depending on design requirements.
- Underlay Materials: Usually 5% to cover overlaps and trimming.
Ordering a small surplus is often more cost-effective than stopping work to arrange additional deliveries later.
Complex Room Layouts
Rooms with unusual shapes, curved walls, multiple corners, or built-in features often require additional materials due to increased cutting and fitting requirements. These layouts generate more offcuts and can significantly affect material usage.
For example, open-plan homes with multiple transitions between rooms may require more precise cutting than simple rectangular spaces. Similarly, flooring installations around staircases, kitchen islands, and structural columns often increase waste levels.
Before ordering materials, carefully review the floor plan and identify areas where extra cutting may be required. This allows for a more realistic estimate and helps prevent shortages during installation.
Taking a methodical approach to estimating flooring materials can save time, reduce costs, and improve project efficiency. By accurately calculating concrete floor slabs, timber flooring components, and waste allowances, homeowners and builders can create a more reliable construction budget and ensure the flooring installation progresses smoothly from start to finish.
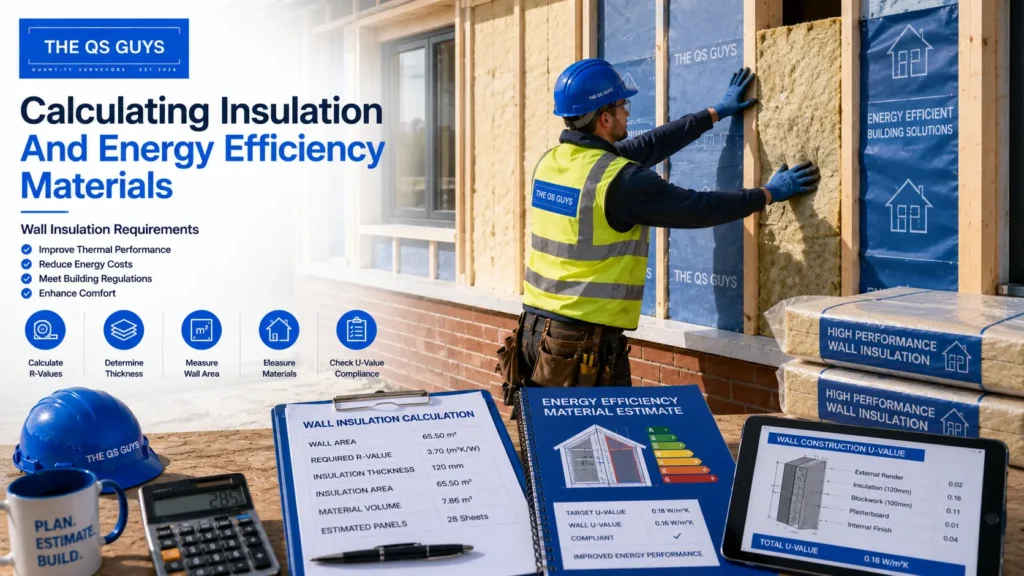
Calculating Insulation And Energy-Efficiency Materials
Insulation is one of the most important material categories in UK home construction because it affects comfort, running costs, and long-term energy performance. When estimating insulation materials, you need to look beyond basic square metre coverage and consider wall type, roof structure, thermal-performance targets, and current UK Building Regulations. A careful estimate helps prevent under-ordering, reduces waste, and ensures the property is built to a reliable energy-efficiency standard.
Wall Insulation Requirements
Wall insulation requirements depend on the construction method, the age of the property, and the target thermal performance of the build. For new home construction in the UK, insulation is usually planned early because wall build-ups must meet specific U-value requirements. This means the material choice, thickness, and installation method all affect the final estimate.
Cavity wall insulation is commonly used where the external walls have a gap between the inner and outer leaf. The estimate should be based on the total wall area, minus openings for windows, doors, and large service penetrations. It is also important to allow for areas where insulation may need careful fitting around corners, lintels, and junctions.
Internal wall insulation is often used when cavity insulation is not suitable or when upgrading older homes. This usually involves insulated plasterboard, rigid insulation boards, or stud-wall systems with insulation between the frame. When estimating internal insulation, include the insulation boards, fixings, vapour-control layers where required, plasterboard, jointing materials, and finishing products.
- Wall Area: Measure the full height and length of each wall, then subtract windows and doors to avoid over-ordering.
- Insulation Type: Match the material to the wall structure, as cavity-fill products and internal-wall boards are estimated differently.
- Waste Allowance: Add a sensible waste margin for cutting, fitting, and awkward wall sections, especially in older or irregular properties.
- Moisture Control: Consider breathable materials, vapour-control layers, and ventilation requirements where condensation risk may be present.
Roof And Loft Insulation Calculations
Roof and loft insulation calculations should be based on the type of roof space and the required thermal performance. A simple cold-loft installation is usually measured by floor area, while warm-roof systems may need calculations across rafters, slopes, and roof build-ups. Getting this right is important because heat loss through the roof can have a major effect on energy bills and indoor comfort.
Thermal-performance requirements are usually linked to U-values, which measure how well a building element prevents heat from passing through. Lower U-values generally mean better insulation performance. In practical terms, this means the estimator must consider both the insulation material and its thickness, rather than relying only on square metre coverage.
Coverage calculations should include the total roof or loft area, any overlaps, and areas around joists, rafters, loft hatches, pipes, and electrical services. For mineral wool insulation, rolls are usually estimated based on coverage per roll. For rigid insulation boards, the estimate should account for board dimensions, cutting losses, and tight-fitting requirements between rafters.
- Loft Floor Area: Measure the length and width of the loft floor to estimate roll-based insulation accurately.
- Roof Pitch: For sloped roof insulation, calculate the actual rafter or roof-slope area rather than using the flat floor area.
- Insulation Depth: Check the required insulation thickness, as multiple layers may be needed to reach the target thermal performance.
- Access Points: Include insulation around loft hatches, pipe runs, and hard-to-reach spaces to avoid thermal gaps.
Meeting UK Energy Efficiency Standards
Meeting UK energy efficiency standards requires insulation estimates to align with approved plans, product specifications, and Building Regulations Part L. Part L focuses on the conservation of fuel and power, so insulation plays a central role in helping the property achieve compliant energy performance. For a new build, the material estimate should support the overall energy strategy rather than treating insulation as a basic finishing item.
Modern insulation practices focus on reducing heat loss, controlling air leakage, and preventing thermal bridging. Thermal bridging happens when heat escapes through weaker points in the building fabric, such as wall junctions, roof edges, window reveals, and floor connections. A good estimate should therefore include not only the main insulation material but also tapes, membranes, sealants, cavity closers, and other supporting materials.
Energy-efficient construction also depends on installation quality. Even high-performance insulation can underperform if it is compressed, poorly fitted, or installed with gaps. This is why estimates should be practical and site-aware, allowing enough material for clean cuts, proper overlaps, and careful detailing.
- Building Regulations Part L: Check that the insulation specification supports the required energy-performance standards for the project.
- Thermal Bridging: Include materials needed around junctions, corners, and openings to reduce avoidable heat loss.
- Air-Tightness Materials: Account for tapes, membranes, and sealants where the design requires improved air-tightness.
- Product Certification: Use suitable insulation products with clear performance data, such as declared thermal conductivity and coverage information.
Accurate insulation estimating supports a warmer, more efficient, and more compliant home. By considering wall build-ups, roof areas, thermal-performance targets, and installation details, you can plan material quantities with greater confidence and reduce the risk of costly changes during construction.
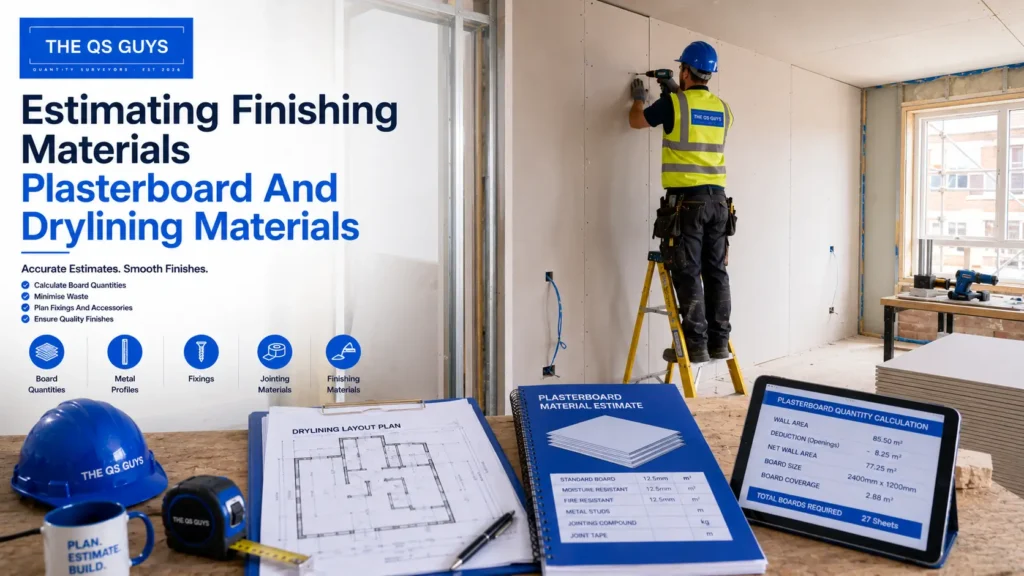
Estimating Finishing Materials
Finishing materials are often underestimated because they seem less structural than concrete, brickwork, or roofing, but they have a major impact on the final cost, appearance, and quality of a home construction project. Accurate estimates for plasterboard, drylining, plaster, and paint help reduce waste, avoid last-minute supply issues, and keep the finishing stage moving smoothly.
Plasterboard and Drylining Materials
Plasterboard is usually calculated by measuring the total wall and ceiling area that needs to be covered. For a more accurate building-material estimate, measure each room separately, including walls, ceilings, partitions, and any boxed-in areas. Once you have the total square-metre coverage, divide it by the coverage of each plasterboard sheet, then add a sensible waste allowance for cuts, breakages, and offcuts.
Ceiling boards may need different thicknesses or moisture-resistant boards depending on the room and building specification. Bathrooms, kitchens, and utility areas often require moisture-resistant plasterboard, while fire-rated plasterboard may be needed in garages, stairwells, or areas with specific safety requirements.
- Wall Coverage: Measure the height and width of each wall, then subtract large openings such as doors and windows to avoid over-ordering.
- Ceiling Coverage: Calculate the full ceiling area of each room and allow extra material for awkward cuts around lighting, vents, and roof angles.
- Board Type: Check whether standard, moisture-resistant, acoustic, or fire-rated plasterboard is required before placing an order.
- Fixings: Include drywall screws, adhesive, corner beads, and any metal or timber framing needed for drylining.
- Jointing Materials: Allow for joint tape, jointing compound, filler, and finishing tools, as these are essential for a smooth surface before plastering or painting.
Plaster Requirements
Plaster estimation starts with the total surface area that needs to be skimmed or coated. In most UK home construction projects, plaster is applied as a skim coat over plasterboard to create a smooth, paint-ready finish. The amount required depends on wall area, ceiling area, coat thickness, surface condition, and the type of plaster being used.
For skim coat calculations, measure the walls and ceilings in square metres, then check the manufacturer’s coverage rate per bag. A smooth, newly boarded surface usually needs less plaster than an uneven wall, while older surfaces may require extra preparation or bonding before the final skim coat is applied.
- Surface Area: Add together all wall and ceiling areas that need plastering, then separate rooms with different surface conditions.
- Skim Coat Depth: A standard skim coat is usually thin, but uneven surfaces may need more material to achieve a level finish.
- Surface Condition: Fresh plasterboard is easier to estimate, while damaged, rough, or previously painted walls may need extra preparation.
- Waste Allowance: Add a small allowance for mixing loss, dropped material, and difficult corners.
- Professional Check: For larger projects, a plasterer can confirm whether bonding, patching, or full re-skimming is needed before work begins.
Paint and Decorating Materials
Paint quantities are calculated by measuring the total surface area and checking the coverage rate listed on the paint tin. Most paints state how many square metres they cover per litre, but this can change depending on surface texture, colour changes, paint quality, and whether a primer or undercoat is required.
A common mistake is estimating for only one coat. In most cases, walls and ceilings need at least two coats for even coverage, especially when painting over new plaster, strong colours, or porous surfaces. Fresh plaster should also be properly sealed with a mist coat before the final paint system is applied.
- Coverage Rates: Check the manufacturer’s stated coverage per litre and adjust for rough, porous, or newly plastered surfaces.
- Number Of Coats: Estimate for two coats as a minimum, with extra allowance for dark-to-light colour changes or feature walls.
- Primer And Mist Coat: New plaster usually needs a mist coat or suitable primer before standard emulsion is applied.
- Room Function: Use bathroom or kitchen paint in high-moisture areas to improve durability and cleanability.
- Decorating Extras: Include rollers, brushes, masking tape, dust sheets, filler, sandpaper, caulk, and cutting-in tools in the final estimate.
Estimating finishing materials carefully helps create a more realistic construction budget and a smoother final stage of work. By measuring each surface properly, checking product coverage rates, and allowing for waste, cuts, and multiple coats, homeowners and builders can reduce delays, improve finish quality, and avoid unnecessary material costs.
Common Material Estimation Mistakes To Avoid
Even a well-planned home construction project can run into problems when material estimates are based on assumptions instead of accurate measurements. In the UK, where material prices, supplier availability, building regulations, and site-access conditions can all affect project planning, small estimating mistakes can quickly lead to budget increases, wasted materials, and construction delays. Understanding the most common errors helps homeowners, self-builders, and project managers create more reliable building-material estimates before ordering supplies.
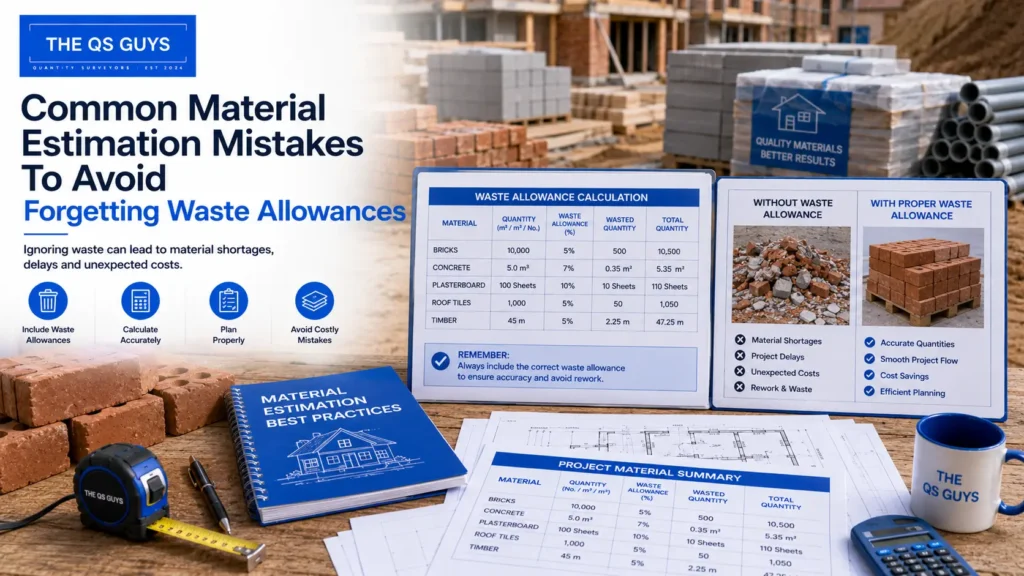
Forgetting Waste Allowances
One of the most common mistakes in material estimation is calculating only the exact quantity shown on the plan without adding a realistic waste allowance. In real construction work, materials are cut, trimmed, damaged, adjusted, or lost during handling. This is especially true for bricks, blocks, tiles, timber, plasterboard, flooring, and roofing materials, where site conditions and installation methods often affect how much usable material is required.
A good estimate should include a sensible waste percentage based on the material type and the complexity of the project. For example, simple rectangular spaces may need a lower waste allowance, while rooms with awkward corners, angled walls, pipe penetrations, or detailed finishes may need more. Ordering slightly more than the exact measured amount is usually more cost-effective than stopping work while waiting for a small top-up delivery.
- Bricks and blocks: Allow around 5% extra for breakages, cutting, and handling, especially when working around doors, windows, and corners.
- Roof tiles and slates: Allow around 5% to 10% extra depending on the roof shape, pitch, valleys, hips, and ridge details.
- Flooring materials: Allow around 10% extra for standard layouts and more for patterned flooring, diagonal installation, or irregular-shaped rooms.
- Plasterboard and sheet materials: Allow around 5% to 10% extra for cuts, offcuts, damaged sheets, and ceiling or wall adjustments.
- Timber: Allow extra for cutting lengths, defects, warping, and changes required during installation.
A waste allowance should not be treated as guesswork. It should be based on the design, material type, installation method, and the builder’s practical experience. This makes the estimate more realistic and helps prevent last-minute shortages.
Ignoring Site Conditions
Another major mistake is estimating materials as if every construction site is perfectly level, open, dry, and easy to access. In reality, site conditions can have a direct effect on material quantities, handling requirements, delivery planning, and construction methods. A material estimate that works on paper may not work on-site if ground conditions, access limitations, or storage restrictions are ignored.
Ground conditions are especially important during foundation and drainage planning. Soft ground, sloping land, clay soil, poor drainage, or unexpected excavation issues can increase the amount of concrete, hardcore, reinforcement, and drainage material needed. This is why a site inspection is so valuable before finalising a building-material estimate.
Access also matters. A narrow driveway, restricted parking, low overhead clearance, or limited space for delivery vehicles can affect how materials are delivered and stored. If large loads cannot be dropped close to the work area, the project may need smaller deliveries, extra handling equipment, or more labour time.
- Ground conditions: Soil type, site levels, drainage, and excavation depth can change foundation-material quantities and preparation requirements.
- Access limitations: Narrow roads, tight driveways, and restricted delivery areas may affect supplier options, delivery costs, and unloading methods.
- Storage considerations: Materials such as timber, insulation, plasterboard, and cement-based products need dry, secure storage to prevent damage before use.
- Weather exposure: UK weather can affect exposed materials, so storage protection and delivery timing should be considered during planning.
A practical estimate should reflect the actual site, not just the drawing. Visiting the site, checking access routes, and discussing storage with the builder can prevent costly surprises once materials start arriving.
Underestimating Delivery And Lead Times
Material estimating is not only about calculating quantities. It also involves planning when materials are needed and whether suppliers can deliver them on time. Underestimating delivery and lead times can cause work to stop even when the estimate itself is accurate. This is a common issue with specialist materials, made-to-order items, structural components, windows, doors, roof trusses, and certain insulation products.
Supplier availability can change depending on demand, location, season, and market conditions. Some materials may be available within a few days, while others may require several weeks. If the construction schedule depends on a specific item, it should be ordered early enough to avoid delaying the next stage of work.
Seasonal demand can also affect availability. In busy building periods, suppliers may have longer waiting times for concrete, bricks, timber, roofing materials, and insulation. Bad weather can also slow deliveries, especially in rural areas or sites with difficult access.
- Supplier availability: Check stock levels before finalising the estimate, especially for specific product ranges, colours, sizes, or performance-rated materials.
- Seasonal demand: Busy construction periods can increase waiting times for common materials and specialist components.
- Phased ordering: Order materials according to the construction programme so that essential supplies arrive before each stage begins.
- Delivery coordination: Confirm delivery dates, unloading requirements, and site-access details with suppliers before materials are dispatched.
A strong material estimate should include both quantity and timing. Knowing what to order is only half the job. Knowing when to order it is what keeps the project moving.
Relying On Rough Estimates Instead Of Measurements
Rough estimates may be useful during early budgeting, but they should not be used for final ordering. One of the biggest causes of over-ordering, under-ordering, and budget errors is relying on assumptions instead of accurate takeoffs. A takeoff is the process of measuring materials from drawings, specifications, and site details to calculate the quantities needed for construction.
Accurate takeoffs are especially important for foundations, brickwork, blockwork, roofing, flooring, insulation, plasterboard, and finishing materials. Each part of the project should be measured carefully, with deductions made for windows, doors, openings, and design changes where appropriate. Without this level of detail, the estimate can quickly become unreliable.
Using scaled plans correctly is also important. If the plan scale is misunderstood, or if printed drawings are not checked against the correct scale, material calculations can be wrong from the start. Digital plans and estimating software can help, but they still need careful human checking.
- Accurate takeoffs: Measure from approved drawings and specifications rather than relying on rough room sizes or visual guesses.
- Scaled plans: Confirm the drawing scale before measuring, especially when using printed plans that may have been resized.
- Opening deductions: Subtract doors, windows, and large openings where appropriate to avoid overestimating wall materials.
- Specification checks: Make sure the estimate matches the required material type, thickness, grade, finish, and performance standard.
- Final review: Recheck quantities before ordering, particularly after design changes or supplier substitutions.
Reliable material estimation depends on accurate measurements, not guesswork. Taking the time to measure properly helps reduce waste, protect the budget, and make the construction process more predictable.
Avoiding these common material-estimation mistakes can make a home construction project easier to manage from the start. By allowing for waste, checking site conditions, planning delivery times, and using accurate measurements, homeowners and builders can reduce unnecessary costs, prevent delays, and make better decisions before materials are ordered.
Tools And Methods That Can Improve Material Estimation Accuracy
Accurate material estimation is one of the most important parts of planning a successful home construction project. Whether you are building a new home, managing a self-build project, or overseeing a renovation, the tools and methods you use can have a significant impact on your budget, timeline, and overall project efficiency. Modern estimating techniques range from traditional manual calculations to advanced digital software, with each approach offering its own advantages. Understanding these options can help you choose the most suitable method for your project and improve the accuracy of your material estimates.
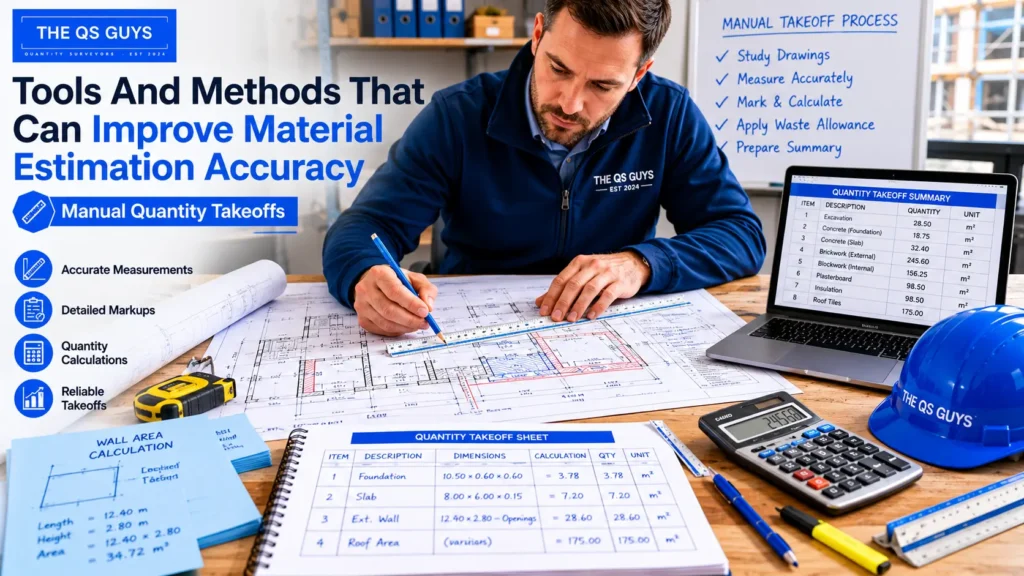
Manual Quantity Takeoffs
Manual quantity takeoffs are one of the oldest and most widely used methods for estimating building materials. This process involves reviewing architectural drawings, site plans, and construction documents to calculate the quantities of materials required for each stage of the project. Builders, contractors, and quantity surveyors often use this method to create detailed material lists before construction begins.
Traditional Estimating Methods
Traditional estimating methods rely on manually measuring dimensions from building plans and calculating the quantities of materials needed. For example, a builder may calculate the volume of concrete required for foundations, determine the number of bricks needed for external walls, or estimate the amount of timber required for structural framing.
This approach requires careful attention to detail and a good understanding of construction practices. While it can take more time than digital methods, it provides a thorough understanding of how material quantities are derived and allows estimators to identify potential issues before ordering supplies.
Benefits And Limitations
Manual quantity takeoffs remain valuable because they encourage a detailed review of project documents and specifications.
- Detailed Understanding: Estimators gain a deeper knowledge of the project by examining every component individually.
- Low Cost: No specialised software is required, making this method accessible for smaller projects and self-builders.
- Flexible Calculations: Adjustments can be made easily when plans change or additional project details become available.
Despite these advantages, there are also limitations to consider.
- Time Consuming: Large or complex projects can require many hours of manual calculations.
- Higher Risk Of Human Error: Mistakes in measurements or calculations can lead to inaccurate material estimates.
- Difficult To Update: Revising estimates after design changes may require significant rework.
For smaller residential projects, manual takeoffs can be highly effective when performed carefully. However, larger projects often benefit from additional digital tools to improve efficiency and accuracy.
Construction Estimating Software
Construction estimating software has transformed the way building professionals calculate material quantities. These digital solutions automate many of the tasks involved in quantity takeoffs and provide a faster, more efficient way to manage construction estimates.
Digital Takeoff Tools
Digital takeoff tools allow users to upload building plans and calculate measurements directly from electronic drawings. Instead of manually measuring dimensions with a scale ruler, estimators can use software to determine lengths, areas, and volumes with greater speed and precision.
Many digital takeoff platforms include features that help users organise materials by category, generate reports, and update quantities automatically when project details change.
Some key benefits include:
- Improved Accuracy: Digital measurements reduce the likelihood of calculation errors.
- Faster Estimating: Large projects can be measured much more quickly than with manual methods.
- Better Organisation: Material quantities can be grouped and managed within a single system.
- Simplified Revisions: Updated drawings can be incorporated without starting calculations from scratch.
Digital takeoff tools are particularly useful for builders handling multiple projects or complex residential developments where efficiency is essential.
Quantity Surveying Software
Quantity surveying software takes material estimation a step further by integrating quantity calculations with project costing and budgeting functions. These systems are commonly used by professional quantity surveyors, contractors, and construction companies to prepare comprehensive cost estimates.
In addition to calculating material quantities, quantity surveying software can help estimate labour costs, subcontractor expenses, and project budgets. This creates a more complete view of overall construction costs and helps improve financial planning.
Benefits of quantity surveying software include:
- Cost Integration: Material quantities and project costs can be managed together.
- Enhanced Reporting: Detailed reports support budgeting and decision-making.
- Greater Consistency: Standardised estimating methods improve reliability across projects.
- Project Tracking: Estimates can be compared against actual project performance.
For larger home construction projects, these tools provide valuable insights that can help reduce financial risk and improve project management.
Working With Builders, Architects, And Quantity Surveyors
While estimating tools are helpful, professional expertise remains one of the most reliable ways to improve material estimation accuracy. Experienced construction professionals understand how design choices, site conditions, and regulatory requirements can influence material quantities.
When Professional Input Is Valuable
Professional advice becomes particularly important when dealing with complex construction projects or situations where mistakes could lead to significant costs.
Examples include:
- Custom Home Designs: Unique layouts often require specialised calculations.
- Structural Components: Foundations, steel reinforcement, and load-bearing elements require precise estimation.
- Challenging Site Conditions: Sloping sites, poor soil conditions, or restricted access can affect material requirements.
- Regulatory Compliance: Professionals help ensure estimates align with UK Building Regulations and project specifications.
Builders, architects, and quantity surveyors bring practical experience that can identify issues that may not be obvious when reviewing plans alone.
Reducing Costly Estimating Errors
One of the greatest benefits of involving experienced professionals is the ability to reduce costly mistakes before construction begins. Even small errors in material calculations can result in project delays, budget overruns, and unnecessary waste.
Professionals can help by:
- Reviewing Calculations: Independent checks can identify potential errors before materials are ordered.
- Assessing Waste Allowances: Appropriate allowances help prevent shortages without excessive overspending.
- Evaluating Design Changes: Updated plans can be reviewed to ensure estimates remain accurate.
- Providing Industry Knowledge: Experienced professionals understand material performance, supplier requirements, and construction best practices.
By combining professional expertise with reliable estimating methods and modern software, homeowners and builders can create more accurate material estimates and reduce the likelihood of unexpected costs throughout the construction process.
Accurate material estimation is not simply about calculating quantities. It is about making informed decisions that support efficient project planning, cost control, and successful construction outcomes. Whether you choose manual quantity takeoffs, advanced estimating software, or professional guidance, using the right combination of tools and expertise can significantly improve the accuracy of your estimates and help your home construction project run more smoothly from start to finish.
Example Material Estimation Process For A Typical UK Home Build
Estimating building materials accurately is one of the most important parts of planning a successful home construction project. A structured estimation process helps prevent budget overruns, reduces material waste, and ensures that work can progress without unnecessary delays caused by shortages. While every project is different, most UK home builds follow a similar process when calculating material requirements. By working through each stage methodically, homeowners, self-builders, and contractors can create a more reliable building materials estimate and improve overall project planning.
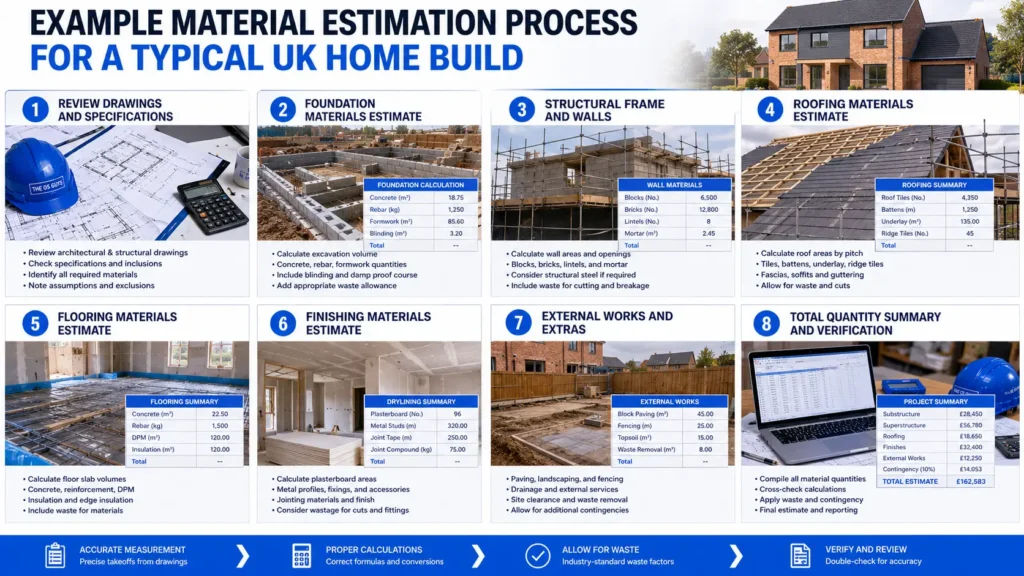
Step 1 – Review Plans And Specifications
Before calculating any material quantities, it is essential to thoroughly review all building plans, architectural drawings, structural designs, and project specifications. These documents provide the information needed to determine the dimensions, materials, and construction methods required throughout the build.
A careful review helps identify important details such as wall thicknesses, roof types, foundation depths, insulation requirements, and structural elements that directly affect material quantities. It also ensures that estimates align with planning approvals and UK Building Regulations.
Key areas to review include:
- Architectural Drawings: Show room layouts, dimensions, elevations, and building features.
- Structural Plans: Outline foundations, load-bearing walls, steel supports, and reinforcement requirements.
- Material Specifications: Identify the types and grades of materials required for construction.
- Building Regulation Requirements: Highlight compliance requirements that may affect material selection and quantities.
Taking time to understand the plans before starting calculations can significantly reduce estimation errors later in the project.
Step 2 – Calculate Foundation Materials
The foundation forms the base of the home and is often one of the first areas where material quantities need to be determined. Accurate calculations are particularly important because foundation materials can represent a significant portion of the construction budget.
Begin by measuring the length, width, and depth of all foundation sections. These measurements are then used to calculate the volume of concrete required, typically measured in cubic metres.
Additional materials may also need to be included in the estimate:
- Concrete: Required for footings, slabs, and foundation walls.
- Reinforcement Steel: Includes rebar, mesh, and structural reinforcement where specified.
- Hardcore Or Sub-base Material: Used beneath slabs to create a stable foundation.
- Damp-proof Membranes: Installed to help prevent moisture penetration.
Ground conditions can also influence foundation requirements. Sites with poor soil conditions may require deeper foundations or additional reinforcement, which can increase material quantities beyond standard calculations.
Step 3 – Estimate Structural Materials
Once foundation calculations are complete, attention can shift to the materials that make up the building structure. These materials form the framework of the home and often account for a large percentage of the overall material budget.
Structural material calculations generally include walls, floors, supporting elements, and framing systems.
For masonry construction, estimators typically calculate the total wall area before determining the number of bricks or blocks required. Openings for doors and windows should be deducted to improve accuracy.
For timber-frame homes, calculations may include:
- Stud Timber: Used for wall framing.
- Floor Joists: Support upper floors and internal structures.
- Roof Trusses: Form the structural framework of the roof.
- Structural Fixings: Include brackets, anchors, screws, and connectors.
It is important to account for design complexity, as features such as bay windows, vaulted ceilings, and multiple roof levels can increase material requirements.
Step 4 – Calculate Roofing And Flooring Requirements
Roofing and flooring materials should be calculated separately because they rely on different measurements and installation methods.
For roofing, start by determining the total roof surface area. Roof pitch must be considered because a sloped roof has a larger surface area than the building footprint below it.
Common roofing materials that may require estimation include:
- Roof Tiles Or Slates: Main roofing covering.
- Roof Battens: Provide support for tiles or slates.
- Roofing Membranes: Help improve weather protection.
- Ridge And Verge Components: Finish roof edges and ridgelines.
- Fixings: Secure roofing materials in place.
Flooring calculations typically begin with the total floor area measured in square metres. Depending on the construction method, flooring estimates may include concrete slabs, timber flooring systems, insulation boards, underlay materials, and finishing products.
Accurate roof and floor calculations help avoid costly delays that can occur when materials run short during installation.
Step 5 – Add Finishes, Insulation, And Waste Allowances
Once the primary structure has been estimated, the next step is to calculate materials required for interior and exterior finishes. These materials are often overlooked during early planning stages but can represent a substantial portion of the final project cost.
Common finishing materials include:
- Plasterboard: Used for internal walls and ceilings.
- Plaster And Jointing Materials: Create smooth finished surfaces.
- Paint And Decorating Products: Applied during final finishing stages.
- Floor Finishes: Such as tiles, laminate, engineered wood, or carpet.
- External Cladding Materials: Used on selected building designs.
Insulation should also be carefully calculated to ensure compliance with current UK energy-efficiency requirements.
Areas requiring insulation often include:
- External Walls: Improve thermal performance.
- Roof Spaces: Reduce heat loss.
- Floors: Enhance energy efficiency and comfort.
- Internal Partitions: Improve acoustic performance where needed.
At this stage, it is also important to include waste allowances. Even with accurate planning, some materials will be lost through cutting, breakage, damage, or installation adjustments. Including realistic allowances helps prevent shortages during construction.
Step 6 – Verify Quantities Before Ordering
Before placing any material orders, all calculations should be reviewed and verified. This final quality-control step helps identify potential errors and provides an opportunity to make adjustments before significant costs are incurred.
Verification involves checking measurements against the latest plans and confirming that no design changes have occurred since the original calculations were completed.
A final review should focus on:
- Measurement Accuracy: Confirm dimensions and quantities are correct.
- Updated Drawings: Ensure calculations reflect the latest revisions.
- Supplier Requirements: Check pack sizes, minimum order quantities, and delivery constraints.
- Waste Allowances: Confirm they are appropriate for each material type.
- Budget Alignment: Verify material quantities remain within project cost expectations.
Many builders and quantity surveyors recommend performing at least one independent review before ordering large quantities of materials. This extra step can prevent costly mistakes and improve overall project efficiency.
Accurate material estimation is a process that combines careful planning, detailed measurements, and thorough verification. By reviewing plans, calculating each construction stage separately, accounting for waste, and checking quantities before ordering, homeowners and builders can reduce risk, improve budgeting accuracy, and keep construction projects running smoothly from start to finish.
Accurate material estimation can make the difference between a well-managed construction project and one filled with unexpected costs and delays. If you want to improve your planning, reduce waste, and gain a clearer understanding of the materials required for your build, explore our expert resources and guides for practical advice, proven estimation methods, and insights that can help you make smarter decisions throughout every stage of your home construction project.
References
- Homebuilding & Renovating – Building Costs and Material Planning Guide
https://www.homebuilding.co.uk/advice/building-costs - Planning Portal – Building Regulations Guidance
https://www.planningportal.co.uk/building-regulations - NHBC – Technical Guidance for Residential Construction
https://www.nhbc.co.uk/builders/products-and-services/techzone - Federation of Master Builders (FMB) – Home Improvement and Building Advice
https://www.fmb.org.uk/homepicks/home-improvement.html - Build Aviator – Building Material Calculators and Estimating Tools
https://www.buildaviator.co.uk/estimators-and-calculators/
FAQs: About How To Estimate Building Materials For Home Construction In UK
What is the first step in estimating building materials for home construction?
The first step is to review the building plans, drawings, and project specifications carefully. These documents show the dimensions, materials, and construction details needed to calculate accurate quantities.
How do you calculate building materials for a UK home build?
You calculate materials by measuring each part of the project, such as foundations, walls, floors, and roofing, then converting those measurements into area, volume, or unit quantities. Always include waste allowances and check that the materials meet UK Building Regulations.
How much extra material should I order for a construction project?
Most projects need a waste allowance of around 5% to 15%, depending on the material and complexity of the work. Materials such as tiles, bricks, plasterboard, and timber often need extra allowance for cutting, breakage, and fitting.
Why is material estimation important before construction starts?
Accurate material estimation helps control costs, avoid delays, and reduce waste. It also helps builders, homeowners, and suppliers plan orders more efficiently.
Can I estimate building materials myself?
You can estimate basic materials yourself if you have clear plans and understand the calculations. For complex builds, structural work, or larger projects, it is usually safer to consult a builder, architect, or quantity surveyor.
What tools can help with estimating building materials?
Useful tools include construction calculators, spreadsheet templates, digital takeoff software, and supplier calculators. These tools can improve accuracy, but the results still need to be checked against the actual building plans.
How do I estimate concrete for foundations?
Concrete is usually calculated in cubic metres by multiplying length, width, and depth. You should also consider footing design, ground conditions, reinforcement requirements, and any changes specified by an engineer.
How do I estimate bricks or blocks for walls?
Measure the wall area, subtract openings for doors and windows, then calculate the number of bricks or blocks needed per square metre. Add a waste allowance to cover cuts, breakages, and site handling.
Do UK Building Regulations affect material estimates?
Yes, UK Building Regulations can affect insulation, structural materials, fire safety, ventilation, and energy efficiency requirements. Your material estimate should match the approved plans and relevant compliance standards.
When should material estimates be updated?
Material estimates should be updated whenever plans, specifications, prices, or supplier availability change. Reviewing estimates before ordering helps prevent shortages, over-ordering, and unexpected cost increases.
Conclusion
Accurate planning and careful measurement are essential when estimating building materials for home construction in the UK because even small errors can affect the budget, ordering schedule, and overall build timeline. A well-prepared material estimate helps reduce unnecessary waste, control project costs, and prevent delays caused by missing supplies or last-minute supplier changes. Before ordering materials, it is always worth reviewing the building plans, measurements, specifications, and waste allowances carefully so each stage of the project is properly accounted for. For larger, more complex, or regulation-sensitive builds, speaking with a qualified builder, architect, or quantity surveyor can provide extra confidence that the estimate is accurate, realistic, and suitable for the construction work ahead.